And I will bury my soul in a scrapbook, with the photographs there and the moths.
~Leonard Cohen

More!!! Scrap That! October Kit

I've got another layout to show you, created with the beautiful Scrap That! October "Autumn Rain" kit.
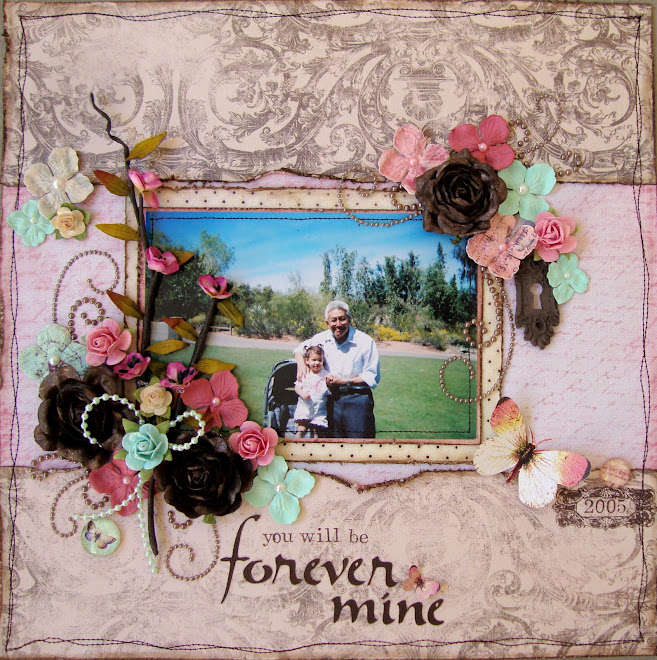
Love love this picture of my daughter. A special thanks to Darien, who edited this for me. She did a fabulous job doing so. THANK YOU!


Here's a closeup of the flowers that came in the kit. I did some fussy cutting for the paper flowers and leaves. The cream ones are flowers made by our fellow DT member Vicky.


The technique product for this kit was CORK, awesome stuff! I used it for matting my strip and circles, which I detailed alittle bit with a brown Zig pen.


A bracket shape that I used from the Bo Bunny Chip pack we got, I altered it by using the crackle paint from Septembers kit.=)


Well that is it for now ladies.
Hope you all have a great night.
Almost time for bed.

Goodnight!
((HUGS))

Scrap That! October Kit Reveal!!

Good Morning everyone!
Today I bring you the reveal of the October Scrap That! "Autumn Rain" kit. The papers featured are from Scribble Scrabble "Sweete Shoppe" and a taste of the Graphic 45 "Steampunk Debutante"! The colors in this kit are such rich fall colors with a splash of teal...bold and beautiful! Also included are some handmade items from our fellow DT member's Etsy Shop(Vicky Alberto).

Ok now onto sharing!
Here is my first layout. I was sooo ecstatic to see we were going to be playing with G45 Steampunk, I had been eyeing those papers for a while.

As you can see we got some gorgeous coordinating Prima roses, also this neat little porcupine quill.


Loved the dramatic look of this dramatic black bloom trim, which I embellished with a few of the Prima centers(included in the kit).


We received a couple bling designs in the kit, this one was my fave. Look at how intricately designed it is, and it's HANDMADE!!


As for my second layout with this kit, it was inspired by the fabulous sketch that came with this kit, designed by our sketch designer LG. The sketch called for 3 pictures, I used one in place of the 3.
The papers on this layout are the featured ones in this kit from Scribble Scrabble.

We were given a pack of Bo Bunny chipboard pieces, I took one of the brackets and painted it brown to better match my page. (the rub on came from my stash).

The cream roses are from Vicky's Etsy Shop, all I did was ink it up a bit. The orange and yellow flowers I made using my Retro Flower Punch. As you can see there was also some fussy cutting involved for the leaves. The technique item for this months kit was CORK, pretty neat stuff.
You catch a bit in this closeup.

I hope you have enjoyed these projects.
Stop by HERE and pick your kit up.
And check out the rest of the creations using this kit over at the Scrap That! Ning Community!

I will have another layout to show you soon!=)

Scrap That! October Kit Sneak Peek

Alright, here's alittle sneak peek at the October kit from Scrap That!
The full reveal is on Sunday, so keep an eye for that!
Enjoy!

Imagine

I am pretty excited that I finally scrapped this picture..it's one of my faves of my son. Those big brown eyes just speak a million words.

Love the look of this layout.
This layout is a combo of the wonderful Graphic 45 papers and Tim Holtz embellishments...which if you ask me, is an absolute heavenly combination.


I tried the paper rolls on a previous layout and liked the result so I did it again. Except this time, I varied the sizes to add a more eye catching look.


For the G45 circle alphas, I distressed the edges and inked them, finished them off by adding some Glossy Accents in the center to add dimension to them.


Well that is all for now=)
Off to relax alittle before bedtime.
Hope you all have a GREAT week!

*Stuck?! Sketch Reveal*-September 15th

It's time to reveal the September 15th sketch from Stuck?!
It's the 15th already! Half the month is is over..Insane!!

Well here is the sketch:


Here is my take.
I absolutely love the way this layout turned out! I still have it sitting out for me to see often lol.
The pictures were courtesy of our Photographer who did our Engagement session last year, Marisa Oldham Photography. Amazing, humble photographer!
All paper are from Pink Paislee "Amber Road" collection. Loved these papers, I will be doing an altered project here shortly using these pps too.

Design Tip: Take a script stamp you have, and randomly stamp on your background paper, make sure you stamp most of the ink off your stamp first, so it looks somewhat faded on your project. You will love the look!


Here's a closeup of my Prima cluster. =) With a little Tim Holts key tucked in there.


And here's the finishing touch..the coordinating keyhole=)I used my fav Martha Stewart Doiley Lace border punch to add the pop of red and break up all the clean lines to this design.

Stop by their blog to check out the other layouts using this sketch.
Have a great evening!
Thank you for the visit.
((HUGS))
~Karen

Stuck?! CT Call for 8.5x11 Scrappers!!

Stuck?! is having a call to add on a few scrappers to design with the impending introduction of 8.5x11 sketches!!
It's a wonderful team to design for!

Click HERE for the full details.
Hurry! The call ends September 22nd!!!

Good luck.=)

Another kit from Scrap That!

You read that right!!! Scrap That! is launching a new kit as of Sept. 15th, a mini album kit!! Here are the details:

Scrap That! is pleased to present our very first mini album kit! This album has been beautifully crafted by our very own Tara Orr and features the BasicGrey vintage inspired Cappella paper collection. Rich browns, sweet cream and soft neutrals are the stunning palette of this kit. Old world elegance, ripe with tradition. Perfect for your pages.


Visit our blog for more detailed photos when we launch this kit on September 15th.

Our mission is to nurture your creativity by providing the best products available, at a reasonable price so you get the most out of your scrapbooking budget. We hope we have succeeded!

Win a copy of the Prima Marketing Idea Book!!!

To kick the "Prima 2010 Idea Book" off, Prima has a free copy to give away!! Here's what you have to do to win:


*Repost this info on your blog, Facebook wall, or any other site.
*Include the link to your post in the comment section of the Idea Book post.
*They will pick a lucky winner next Tuesday, September 21st!
*Open to all countries.

Click HERE for the original Prima post.

I Love You

It's been a pretty quiet weekend around here, allowing me to scrap alittle.
The picture in this layout was taken this past summer in Idaho. I'm surprised at how fast I am getting all our vaca pictures scrapped.

I have had this canvas 12x12 piece for a while now, I cut a portion of it, used my script stamp and inked it alittle.

Here's a few other closeups.

Well I am off now. Time to do laundry. Yay!
Hope you all have had a great weekend!

New Etsy Shop in Town!!

So a fellow scrapper has opened up an Etsy shop!! Her name is Vicky, you may all know her by Simply Paper. She was so kind as to send me goodies from her shop, therefore I am here promoting her little store.=)

I got a blue boy kit, sooo cute!!
The blue flowers, clothes pins, canvas "boy" tag, the lace trim, chipboard flourish and train all came from her shop. She also sent me a doiley which is ACID FREE!! She ensures that all the embellishments she sells are all acid-free.


My kiddies were so little in this picture. Nik was 4 and Jaybug was only 3 months!! =( Gosh do I miss those days.

Well just a simple quick layout to show off her goods she is selling.
Be sure to check her Etsy out! She will be consistently adding new things, so drop by often!!

((HUGS))

Follow Your Dreams

Here's the 3rd layout I just finished...I really did catch up on my scrapbooking this weekend..holy cow. I have other projects I have made too but cannot share with you just yet=) heehee

This line of paper is also from Fancy Pants "Road Show" collection, it has to be my all time FAV from them! The colors and patterns are so soft and delicate. Love them!

The black script that you see towards the bottom is a stamp I used thru out the paper. Everything in the corner are rub ons from the same Road Show line. The rub ons in this pack look so dimensional its awesome. You can see it in the Fleur D Lis, it looks like its going to pop right off the page.


I used one of the Notebook Journaling Cards from the line and simply put my title on it. I cut around the flowers on the card so they would stand out alittle more against the lighter background.

The flourishes are also from the rub on pack. The flowers I made myself using my handy dandy retro flower punch. (The tutorial to this flower is in the post below this one..so keep reading!!)=)

Well that is it for this weekend lol..I hope you enjoyed the layout as well as the tutorial below =)
Off to do some laundry..BLAH!

Retro Flower Tutorial

Ok so I have been making alot of these little flowers lately using my Retro Flower Punch. Its an easy and fast way to make coordinating flowers for your project.


Here's the tutorial for you ladies to try out. My 6 year old daughter can make these!!...goes to show these are very easy.

Gather Your Supplies:
-Large Retro Flower Punch
-Medium Retro Flower Punch
-Pen, stylus, anything with a round tip
-Diamond Dust & Glossy Accents(Optional)


Instructions:
**Punch 2 large flowers and 1 medium flower.
1. Use the end of your pen/tool to curl the petals inward, do this to all petals on all 3 flowers.


2. This is what your flowers should look like after you're done.


3. Glue one large flower on top of the other large flower, making sure that the petals are not uniform with each other. Then glue the medium flower right on top. Like this...


4. You can be done at the last step OR...you can do one last thing to it. Dab some Glossy Accents on the ends of the petals, dip it in Diamond Dust and tada!!


Then it'll look like this..


Just simply add a center such as a brad, pearl or button and you're done.
It's as simple as that!
Give it a try!

You & Me

This layout is a bit different from my usual style, I tried sooo hard to not use flowers and succeeded..thank goodness for pin wheels!!

The photo is of my husband and son on the dock of the Coeur D' Alene Lake in Idaho.
They were just sitting there and I thought "oh my god! This is a perfect photo op!" so snap snap and I got it!
The papers are all from Fancy Pants "My Family" collection, love the colors and designs.

So I needed SOMETHING to take the place of my usual flowers...I gave it a go at trying to make pin wheels, and I must admit that I LOVE how they turned out.

I have seen lots of little rolls of pps on projects lately, so I also tried that out too. In the end the layout turned out pretty simple, but I like it, it allows the picture to really stand out.

Well I hope you enjoy this layout.
Been really busy scrapping this weekend. Haven't made time for it for almost 2 weeks, and I needed my fix BAD!
Til next time...(which should't be too far away) :p

Together

So I took some time to sit down and have ME time..meaning scrappy time!!! =)

Here's a layout I did...the photo is of my husband and I from this summer in Idaho. We had a date night;)...don't get those a whole lot nowadays.
The papers are from Fancy Pants "My Family" collection.


All the flowers but the mini roses are handmade using my Retro Punch. (Tutorial to follow tomorrow!!) The roses are Prima, just glimmer misted them with Candy Apple Red.


Well off to create some more!
Have a safe and fun weekend.
((HUGS))

LinkWithin

Related Posts with Thumbnails