And I will bury my soul in a scrapbook, with the photographs there and the moths.
~Leonard Cohen

Scrap That! May Kit Reveal & Anniversary Blog Hop

Welcome to the Scrap That! May Kit Reveal and Anniversary Blog Hop!
Starting today the 26th at 10 AM MST and ending May 28th at Midnight.

If you have just arrived here from Janis's blog, then you are in the right place! If not, head back to the Scrap That! blog and join us.

Today I am going to share with you my projects using the Scrap That! May "Romantic Spring" kit featuring the gorgeous "Butterfly Garden" paper collection from Pink Paislee.


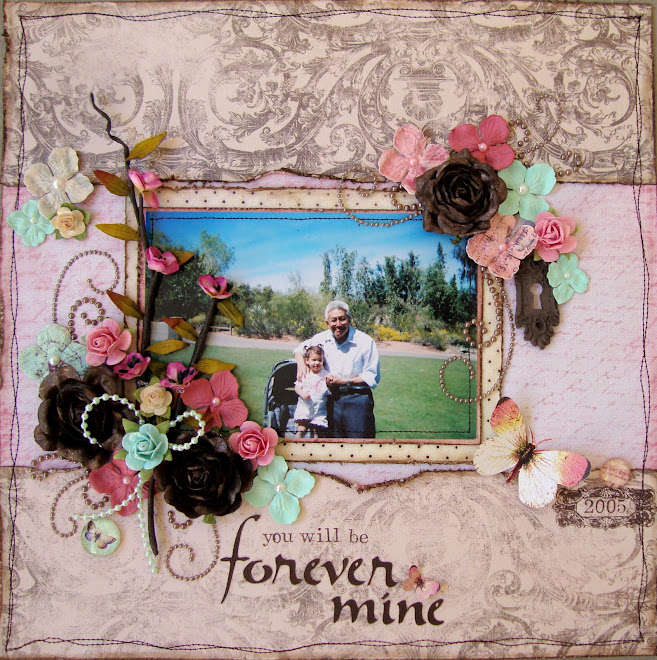
Here is my first layout. Absolutely beautiful papers! I fussy cut the scalloped circles from one of the papers.

We received another bottle of Liquid Pearls in the kit, lovin' that stuff, I used it on the circles in this layout, its a great quick dimensional touch to your projects.


A closeup of the beautiful Webster's Pages blooms, for the smaller Prima cream flower in the corner, I wanted it to coordinate alittle better, so I simply took a q-tip, wet it a bit, dipped in a chalk ink and dabbed the center of the flower.


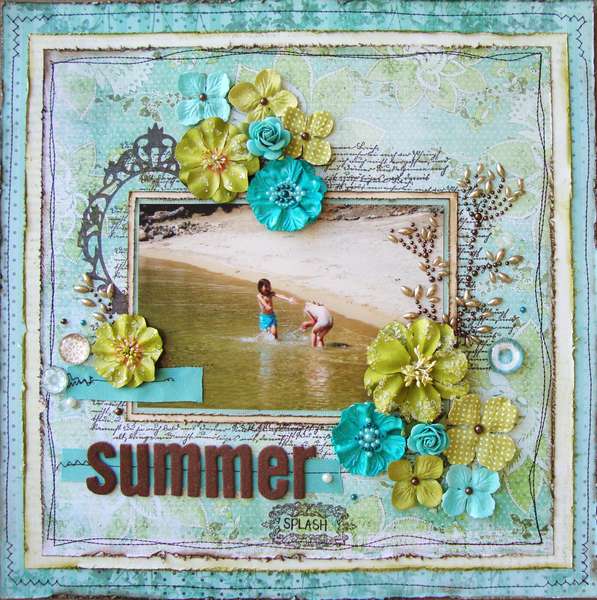
Here is my 2nd layout.
Also featuring the Butterfly Garden papers, for this layout, I chose the more softer pastel colors in the papers. Which matched perfectly with the blooms in the kit.


Ok lastly, here is my 3rd layout using this gorgeous kit.
We also received a Prima Mistable Canvas sheet! Ecstatic to see this! Along with a bottle of Perfect Pearls Mist. I went to town misting this baby and fell in love with the result! I mixed the blue mist we received in the kit with a green mist I had in my stash.


Here is the Dusty Attic piece you will LOVE, in the kit-oh yeah! I glimmer misted mine with brown, you can just see how well the shimmer shows on the chipboard! And the background on the canvas--super shimmery, this layout IRL is UNREAL!


Love the details on this canvas, you don't have to do much and it looks amazing


Before you hop along to LG's blog next you will want my secret word, which is....*IS*.


**Remember, that in order to qualify for the Grand Prize of a fully loaded Scrap That! Paper crafting kit you must:
1. Visit all 8 blogs on the hop, leave a comment and become a follower of each.
2. Go to Scrap That! Facebook page and become a friend.
3.Go to the Scrap That! Social Community and become a member.
4.Email the secret sentence to friends@scrapthat.

This month we are offering a BONUS PRIZE of some delicious Dusty Attic chipboard! We want to give a special thank you to our good friends over at Dusty Attic for their generous contribution of the gorgeous laser chipboard dress form in our May kit.
Visit their NING community and become a member, then leave a comment in the thread under Scrap That! BLOG HOP which you will find under FORUM-Featured Discussions. We will draw a random winner from all who leave a comment.

Scrap That! is also extremely excited to share with you that we are sponsoring The Color Room for the month of May!!
The color palettes during May will all be created from the colors of the Scrap That! Kits!

We invite you to play along during the month of May, for a chance to win some goodies from The Color Room. Simply upload your work to The Color Room and Scrap That! galleries each week to be considered for a RAK or a Spotlight Feature. You will need to use each color in the revealed palette. Resize your image to 750 pixels and no larger then 250kb and post your project before the next Friday palette reveal.

Now head on over to LG's blog, for some more amazing inspiration!

We hope you all had good fun hopping with us today, thank you so much! Watch out for the Scrap That! newsletter on May 21st to see if you are one of the lucky winners!

♥Karen

Scrap That! May Kit Sneak Peek

Wow this is crazy! It's almost the end of April...meaning another Scrap That! kit reveal soon to come. For now here is a sneak to the Scrap That! May kit.

Stay stuned...the 26th will be full reveal and a monthly blog hop!!
Don't miss it!!


She Is....

I created this layout of my daughter this weekend. Pretty busy weekend too...worked Saturday 8-noon, baby shower @ 2, family clothes shopping afterwards...today went to the movies w/ the kiddies to watch Rio, super cute movie might I add. Needless to say, after this weekend, I am sooo behind on laundry, I barely touched it. Owell it was fun...that's all that matters.

Ok so onto the layout =)
The papers featured in this layout are My Mind's Eye "Madison Avenue".

I've been playing around with alot of my punches, I wanted to show you a quick way to turn a plain circle into a decorative edged circle...it's very simple...ready for it? wait for it...wait for it...ok...you can use your CORNER PUNCH for this technique. Just need to be very careful to align your next punch with your previous one, so your design looks clean.
Here is a closeup. I used my Fiskars "Circles" Corner Punch.

Check out the gorgeous Dusty Attic piece! I fell in love with this one. I altered it first by inking with a light cream chalk ink, then stickled it and I mean I STICKLED it alright! If you're wanting to get your hands on some DA, stop by Vicky's ETSY SHOP!

I also used my Fiskars "Flower" Punch. I lightly inked the center with a soft pink to give it more definition and added a pearl as a center...perfect touches for this girly layout.

K off to eat another grapefruit! Then bed...I am exhausted!
Goodnight!
♥ Karen

Stuck?! Sketch Reveal--April 15th

Halfway thru the month! Woohoo...almost time for my birthday too..double woohoo!
It's that time yet again..here is the April 15th Stuck?! Sketch..


And my layout for it. The papers featured are Prima's newly released "Botanical" collection. I simply flipped it upside down. You will see lots of Dusty Attic in my upcoming layouts....there's a NEWLY STOCKED Etsy in town that is selling DUSTY ATTIC..check out Vicky's shop HERE!


I wanted to incorporate a little bit of green, so I misted over a Prima mask in the top corner. Then placed my bling swirl over the misted design.

I love the subtle gears and sprocket designs on the papers in this line...beautiful!


Take a moment to stop by Stuck?! to check out the other layouts.
WOW that was a rather short and quick post huh...hmmmm must be from exhaustion. Work was busy...busy...go go go!
And I am now feeling it.

So time to veg, curl up on the couch with a soft blacket and my fuzzy socks.
Goodnight everyone!

♥ Karen

Forever Mine

So as alot you that follow my blog, have come to see that most of my layouts showcase my daughter...well I thought that this weekend, I would take some time to create a layout that showcased my son and I using a photo I took of us recently. The look on his face was perfect for this shot of a sweet kiss on his cheek.
This little boy has my heart, a sweet little guy that gently squeezes me when he hugs me, the one that tells people in public "This is MY mommy", the one that will randomly hold my hand, the one that tells me randomly several times thru out the day ..."Mommy I wuv you.", the one who always knows when even the slightest thing is wrong with me... This little guy has heart...and I am thankful to have had him and to know that he will forever be mine.

So I thought the least I could do, was make a memory for him in a layout so he knows..he's mommy's boy forever.

The papers featured are Prima "Moulin Rouge",
I was aiming for more vintage colors so these papers were perfect. I kept my choice of papers simple though, using a patterned paper as my 2 background papers, but my main background paper was just a cream cardstock which I altered with a mask and some Glimmer Mists.


I wanted to create my own "die cut" paper so I used the Fiskars "Effervecence" border punch all the way around the paper. Loved the end result.


I needed perfect coordinating blooms for this color scheme, which was quite tricky, being I only had one blue flower left, so I made my own matching blooms(the paper ones that is)! To find my tutorial on how to make this flowers, click HERE. I simply used a scalloped circle and medium 6-petal flower punch.
Products Used: Papers: (Prima "Moulin Rouge") #842062, #842109; Moulin Rouge Notecards #545161; Flowers: "Gatsby" Bay #546403; Blossom Branches "Pistacchio" #543174; Bling: Swirl w/ Lace "Cabaret Brown #540890; Prima Stencil Masks Mix 4 #882150; Dusty Attic "French Flourish" #DA0273; Tattered Angels Glimmer Mist: Slate, Tattered Leather; Tools: Fiskars "Effervecence Border Punch #01-4598, Xtr Lrg Squeeze "Seal of Approval Punch #03776, Medium "Poppy" Lever Punch #01-005470.

Thanks so much for the visit, I hope you enjoyed your stay. =)
Goodnight to everyone out there!
♥ Karen

Hello Card**Step-by-Step & Flower Tutorial**

This weekend was that of a dreary one...cold, dark and full of snow...in the middle of Spring! CRAZY! So I stayed indoors and in between laundry loads I scrapped to my hearts content.

I made a card using the Bo Bunny Timepiece Collection along with a few Fiskars punches.
Here is a step-by-step on how to recreate the design of this card.

Step 1.
Cut cardstock to 8Lx5W. Score middle to make crease in card, fold in half.

Step 2.
Choosing 3 coordinating patterned papers...cut one to 4Lx5W, the second to 3 1/4Lx4 1/4W, and lastly the last cut to 2x2. Adhere the largest piece to the face of your card, layering the 2nd largest in the center.

Step 3.
Cut a strip of cardstock measuring 2 1/4Lx5W. Using a corner punch as a border punch, punch both sides. I used the Fiskars Corner Lever Circles. Just be sure to remove the guards and be careful to match up your last punch precisely so your design looks neat.

Step 4.
Adhere strip to center of card, embellishing with ribbon, lastly adding the 2x2 square on top.

Step 5.
Adhere flower to center of square. And stamp your sentiment on the bottom center. TADA! You're done!
Products Used: Papers(Bo Bunny Timepiece) #12th639, #12tco707, #12td615; Tools: Fiskars Punches: Xtra Lrg Squeeze "Seal of Approval" #01-03776, Medium 1 inch "Poppy" Lever #01-005470, Corner Lever "Circles" #01-005486; Other: pearls, ribbon & sentiment stamp.

**For my card, I used a handmade bloom.** There are many times that I see wonderful flower tutorials and think..well darnit I don't have those flower punches...so here is a tutorial to recreate a bloom everyone is familiar with but might not have the same punches.

Here is the tutorial.
You will need:
*scalloped circle punch
*any flower punch with at least 5-6 petals.
I used the Fiskars Xtra Lrg "Seal of Approval" and Fiskars Medium "Poppy" Punches.

Step 1.
Punch out 2 scalloped circles and 5 smaller flowers.

Step 2.
Taking both your scalloped circles, simply draw in petals. As many as you'd like, I chose to do.

Step 3.
Cut the petals on both your scalloped circles, ink the center of them. Lightly mist with water and scrunch them up to achiever a more dimensional look.

Resulting in with this look.

Step 4.
For the center of your bloom, take the 5 smaller flowers, cut in between each scallop almost to the center. Taking one flower, scrunch it up in the same manner, using very tacky glue, adhere it to another flower.

Then scrunch those 2 upwards, then glue those 2 to a 3rd flower and do the same until you're all done with all 5 flowers. This is what it will look like when you're done.

Step 5.
Adhere your small bloomt to the center of your large bloom. Now you have yourself a pretty little bloom without fancy flower punches. =)

Well I hope you enjoyed this tutorial as much as I enjoyed putting it together for you and I hope you find inspiration within it one way or another.

Now off to eat a grapefruit! YUM!
And to fold yet another load of laundry...story of a wife's life. ;)
♥ Karen

Sweet--Graphic 45 *Curtain Call*

Here's a layout I made recently using the ever so gorgeous and vintage Graphic 45 "Curtain Call". I think this line is on the top of my fave G45 paper collections list.

I did alot of machine stitching on this project...I love the vintage touch that genuine stitching gives.

I handmade the blooms using my Floriano Flower Punch and embellishing the center with some beautiful Graphic 45 Staples metal brads.

I stamped the heart using Tarnished Brass Crackle paint..wonderful effect. Thanks the amazing Ingvild for inspiring me with the large heart stamp.

Lastly, I made a card using more Graphic 45 papers...but for this card I used a few Communique papers.

That is all for tonight.

Tomorrow I will have another project to share...been a busy bee...creating some goods.
Now it's time to try this new Jello Caramel Mousse stuff I made...yum...con my hubby into playing with my hair too..while I veg and watch tv...Yup sounds good to me. ;)

♥ Karen

Stuck?! Sketch Reveal--April 1st

So finally I can reveal my April 1st Stuck?! Sketch...I know I know! 5 days late...we're doing it differently now, revealing the CT's creations in 2 parts since there are so many of us.

Anyway, so it's April!...my birthday is this month...the 26th and I turn 26..WOW BUDDY! I can say that I am very pleased with everything in my life for being a 26 yr old, I have a wonderful family, surrounded by an amazing (SMALL BUT SOOOO AMAZING) circle of friends. My marriage is stronger than ever, my kids are growing up to be such well mannered chitlins..I am stoked with my job and love every minute it. I don't think I can ask for anymore for being my age. LOVE IT! Plus I got a sucker husband that is so0o willing to support this crazy hobby of mine;p heehee.

Ok so nuff rambling..here is the sketch:


Here is my take:
Featuring some gorgeous Prima papers.
The photo is of my daughter who is sooo hooked on her Nintendo DS. She sleeps, breathes, eats this DS..oh and misses the school bus in the morning for this DS! Crazy! lol...Of course we have learned to set some strict rules for this little toy.


Products Used: Papers(Prima "Fairy Flora") Sunny Day-#841737, Summer Storm-#841751, Pixie Garden-#841744; Flowers: "Painterly Hydrangeas" Tan-#533441, "Floret" Tamyra-#548155, "Eminence" Mix 11-#546250, "Primrosa" Woodland539404; "Lovely Fabric Leaves" Mix 6-#547523; "Blossoming Branches" Walnut-#543181; "Times" Chipboard Alphas Foggy Script-#536879

Stop by Stuck?! to check out the CT's creations as well as participate in the challenge to win a fab prize. Check it out!

♥ Karen

LinkWithin

Related Posts with Thumbnails