And I will bury my soul in a scrapbook, with the photographs there and the moths.
~Leonard Cohen

Scrap That! August Kit Reveal

Its reveal day for Scrap That! Gosh time flies, it feels just days ago we revealed the last kit.

Excited to reveal the Scrap That! August Kit...it is sooo BEAUTIFUL. This one takes the cake! It is packed...wait..I will say the box came brimmed with goodies. Also included was a ribbon kit put together to perfectly match this kit, so many pretty ribbons! The beautiful pps that are featured in this kit are from Girls Paperie "Paper Girl" Collection. Beautiful pps, gorgeous embellies, great technique items(liquid pearls, ink)...many ideas started going thru my little head.

Here is my 1st layout.
I took this photo of Nikki and she just looked so beautiful..thank goodness she never gets tired of me taking pics. I cut the bracket shape out(kept the inside part for another project) and stitched along the shape..lol let me tell you, it was a bit hard trying to stay within the shape...but I did it...well sorta. =] The green fishnet-like and the yellow satin ribbon came in the ribbon kit.


We got a sheet of beautiful vintage cards, I cut this one out and inked it alittle so it wouldn't be so white against the cream cs.


There was a floral pp and couldn't help but fussy cut the flowers out. I added some pretty little Petaloo flowers(included in the kit) to give a sort of dimensional look, the flatness of just the pp flowers bugged me alittle.


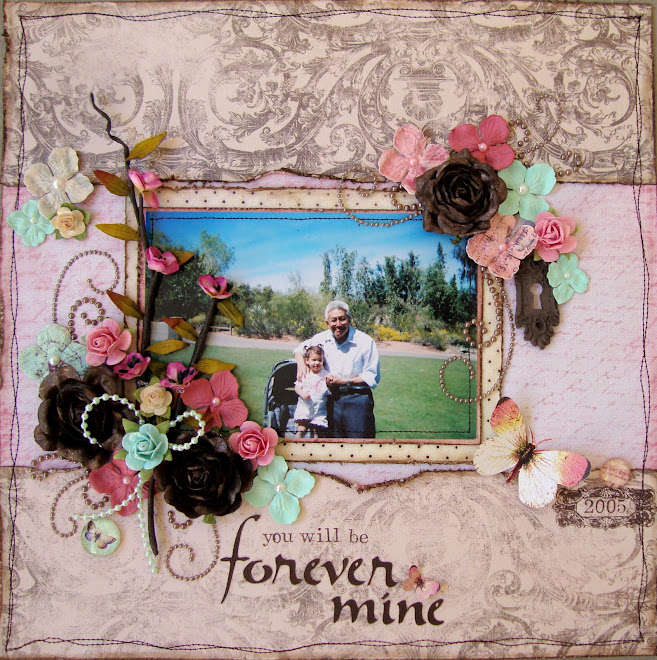
As for my second layout...
I was shooting for a more softer, delicate look. I took this photo of Nikki and edited it alittle(adjusted the saturation) and I fell sooo in love with it, I knew it'd be perfect with these pps. Gorgeous Prima blooms and butterfly.
For the matting of the circle, I simply punched a strip of cardstock with my fav scalloped lace border punch, cut out all the scallops and glued it to the back of the circle...one by one, til I was done.


Closeup of the Prima blooms. There's another one of those vintage cards we got, I rolled it up and tied twine around, strategically showing just the 'sweetheart' part.


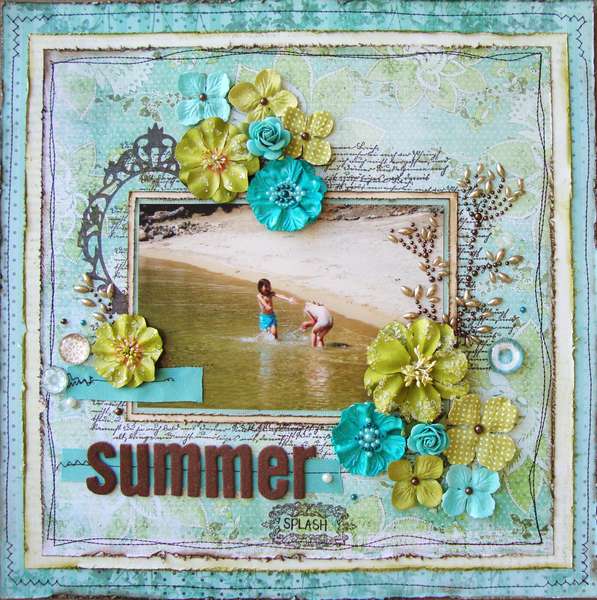
Here's my 3rd layout done with this kit.
Quite a bit of paper layering on this one along with stitching. The butterflies are from Jenni Bowlin, just slightly altered them with GM.


The flowers were made from fabric in the kit. Here's the tutorial for those...if you'd like to give them a shot. The pink pearl center came from one of the Prima blooms I didn't use.


Closeup of some of the flowers that came in the kit. Love those paper flowers from the Paper Girl line. The blue sheer ribbon also came from the ribbon kit.


Be sure to check out the rest of the DT's projects using this kit. You can find the links in the right side bar.
Don't wait!!...get on over to Scrap That! and get your August Kit. It'll be one that sells out FAST!

Thank you for stopping by!
Have a great week!
((HUGS))

Stuck?! Sketches

Photobucket

Here's a HAPPY BIRTHDAY shout out to Stuck?! Sketches! It's their 1st birthday since their relaunch! Woohoo!

In leau of that celebration, there are going to be some exciting these things going on over there! Be sure to keep an eye on the blog...you will surely want to be a part of this.=)

A great time..great prizes...fun to be had.
Stay tuned!

***Pssst...keep an eye out for the upcoming blog hop! :p

Scrap That! August Kit Sneak Peek

It's almost time for the Scrap That! August Kit reveal!!..but til then here is a sneak peek of some of our designs just to tease ya alittle=). This kit is absolutely beautiful!

**Stay tuned for the full reveal in just a few days on the 26th!!!


Have a great day!

A piece of family history...

K so in our bedroom on top of this corner shelf furniture piece we have, sits a brass vintage car. I have always wanted to bring it down for my son to see, because he has always been so in awe of it, but I know better then to do that, my hubby treasures this car.

Well today I asked him, what's the memory behind that car...he told me it was his granfather's sister's..wow thats generations back and automatically I wanted it down!! So I took it down, put a towel over it(couldn't let hubby see me!), walked out front with my son and let him 'play' with it...he was so careful with it, it amazed me.

I caught a few snapshots..here they are=)


You can tell I didn't even bother dusting it off, I needed to get this thing out of the house ASAP..lol (I think the dust gives the little car character)


I showed him after I took the pictures and he just gave me the LOOK and I said "what?! The pics came out good!", he agreed, so I didn't get lectured..heehee

Stuck?! Sketches Submissions

So as you all may have read in a post a few days ago, I made the Stuck?! Sketches Creative Team. =) The 2 layouts below were my submissions to the call, I can now share them with you!

This was the application sketch.


Here was my take on it.
It's all jam packed full of Prima, but of course. Add Image


The birds are from Dusty Attic, painted them a light turquoise then stickled them with several colors.


Here is my 2nd layout created for the call. Can you tell I love me some Prima???!! :p

This layout has some emotional weight to it:( It's of my dad and daughter when she was only 1 1/2 yrs old, it was Easter and we took her to the zoo for the first time. Next month will be the 4 year anniversary of his death...I miss him so much. We lost him suddenly to a massive stroke...how I wish he was still here to see who she has grown up to be, this little girl was his world, they were thicker than thieves...

The title came so easy to me, she knows in her heart that Grandpa will be forever hers...I can still feel him near, he will always watch over her..I know this... ok tears are building up and I'm rambling now....onto the next close up=/


Here's my flower cluster with a gorgeous vine in the center. I cut up a beautiful Zva pearl bling to embellish around the cluster.


I bought all these beautiful keyholes from my LSS when they were on sale and finally remembered to use one!


Oooh also, today is my day to shine over there!!.... as in my introduction to the team!!=)

Thank you for stopping by and having a peek.
((HUGS))
~Karen

Another Fabric Flower Tutorial

Here I am with another fabric flower tutorial.=)
This one requires alittle sewing but nothing major AT ALL!

K onto the point of this post!

Supplies:
*Fabric
*pretty center(pearl/brad/etc.
*scissors
*thread
*needle

Instructions:
Cut 2 strips of fabric, one being 1 inch wide & about 14 inches long, the 2nd strip being 1/2 in wide & 6 in long.


Take your longer strip, fold over one end of the strip and secure it with a stitch.


Then run a stitch across the entire bottom of your strip.


Once you're done running your stitch, pull the thread, this will make your fabric gather.


Secure the back with a few stitches, this should be what your flower looks like when you're done.


Repeat the above steps with your shorter strip. This will give you two blooms in the end. Attach the smaller one on top of the large one with a few stitches, adhere your center..Voila!! A quick and easy fabric flower!


Hope you found this tutorial pretty simple!

K off to bed now.
Goodnight!

I made the team!!!

Ok so I can finally say it...I was extended an offer to be a part of the Stuck?! Sketches Creative Team!!! How exciting!!! It's a fortnightly sketch blog for those looking to get their creative juices flowing.

I had been watching their blog for a while, noticing their great sketches and was so excited to hear back from them. =)

Congrats to all the ladies that also made the team. Excited to work with Sara and all the gals using these awesome sketches!

July 1st--**Stuck?! Sketch**

Here is the July 1st Stuck?! Sketch.

And here is how I interpreted it, I slightly rotated it.

The papers are from My Mind's Eye "The Spiders Web" collection...some of the papers in this line are so versatile for other themes. By looking at this, you'd never think they're halloween pps.

The frame is a DA piece which I crackled painted with Black soot.

I chose to not mat my photo with cardstock, I wanted to try something different. So I framed it with a Daisy D's frame rub on...love the look!


The larger flower is a Petaloo, was so stoked to see I had one left from the package to use on this layout. I took its original center out and placed a Creative Imaginations brad in its place. The surrounding flowers are Prima.=)

Be sure to check out the Stuck?! Sketches blog! Awesome sketches to get your creative juices flowing and plenty of inspiration from the creative team.

Well thank you for stopping by=)
Have a great day!

My Grandparents

This is a layout of my grandparents from my mother's side(a few years back) I scrapped it for my BOM. I so wish I had more heritage photos....I'd have the time of my life scrapping them..unfortunately all I have are recent photos...but I am ever so grateful for those.

All the papers on this layout are from My Mind's Eye So Sophie. I absolutely love that new line, it's beautiful.
Ok I tried something new this time. A fellow amazingly talented scrapper, Tara Orr uses paper doileys and I have always admired the look she achieves with them...sooooo I went out, bought some and gave it a shot. I L-O-V-E it! I glimmer misted it with Olive Vine and used it as part of my background. Now if I could find some square paper doileys, I'd be set!=)


Closeup of the Prima flower cluster, I have noticed that lately I have been stuck on hydrangeas, they go so well with just about everything!


The branch is a Dusty Attic piece, was so ecstatic to get my hands on some of this beautiful chipboard. I got mine from a shop called Stay True to God, be sure to visit her!
I painted this with brown acrylic paint and then dabbed gold on it to coordinate with the gold from the Tim Holtz metal pieces.


Hope you enjoyed this layout.
Have a wonderful and safe 4th of July!

~Karen

Fabric Flower Tutorial

Making your own flowers is the newest trend in scrapbooking...therefore I bring you a quick and pretty fabric flower tutorial. It takes but a few minutes!!

Supplies needed:
*Hot glue gun
*Fabric
*Cardstock
*a puuurdy center(button, brad, pearls)

Instructions:

Cut a strip about 1 inch wide and 20 inches long of fabric(it doesn't have to be perfectly cut as you can see) =) Cut a 2 and a half inch circle from cardstock(this will be what you adhere your fabric to). **I like to cut my circle from coordinating cardstock just in case your paper peeks thru your fabric.


Place a dollop of hot glue in the center and adhere one end of your strip.


Start working from the center out, slightly twist the fabric as you go around. Work fast as hot glue only gives you a few secs before it dries. **Only put down a bit of hot glue at a time or it will dry before you get a chance to put your fabric down.


Once you are done you will probably have alittle bit of extra fabric, just place a dot of glue to the back of the circle and fold the fabric back.


Lastly embellish your center, whether it be with a decorative button or pearls. Tada! You've got yourself a handmade flower, done in justa few minutes!


Here's a layout which I used this type of flower on.


Hope you enjoyed this tutorial!
~Karen

LinkWithin

Related Posts with Thumbnails